|
|
UMBC High Performance Computing Facility

How to run CUDA programs on maya
Introduction
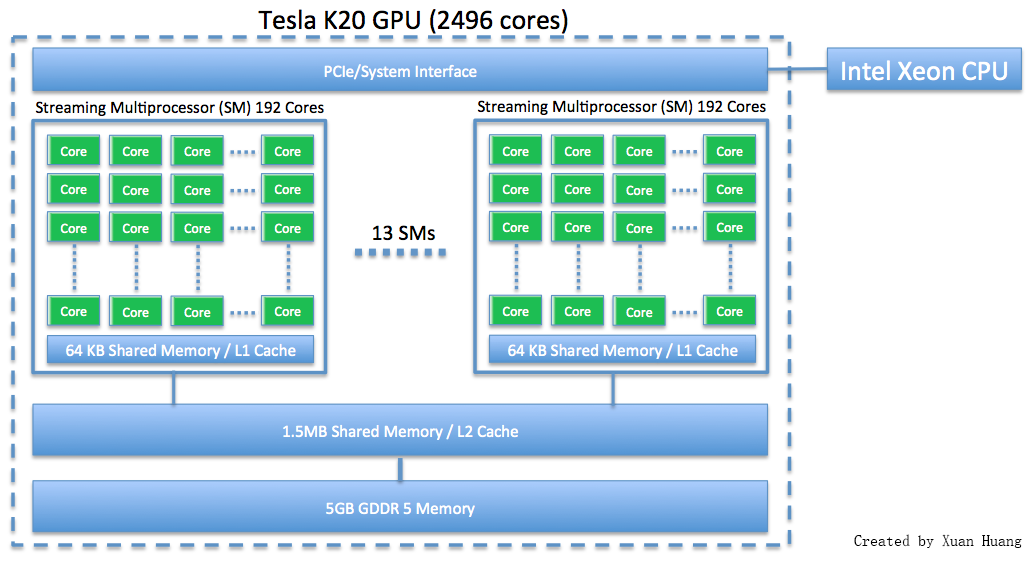
This webpage discusses how to run programs using GPU on maya 2013. The NVIDIA K20 is a powerful general purpose graphics processing unit (GPGPU) with 2496 computational cores which is designed for efficient double-precision calculation. GPU accelerated computing has become popular in recent years due to the GPU's ability to achieve high performance in computationally intensive portions of code beyond a general purpose CPU. The NVIDIA K20 GPU has 5 GB of onboard memory.
|
[hu6@maya-usr1 ~]$ module list
Currently Loaded Modulefiles:
  1) dot                                     7) intel-mpi/64/4.1.3/049
  2) matlab/r2014a                           8) texlive/2014
  3) comsol/4.4                              9) default-environment
  4) gcc/4.8.2                              10) cuda65/blas/6.5.14
  5) slurm/14.03.6                          11) cuda65/toolkit/6.5.14
  6) intel/compiler/64/14.0/2013_sp1.3.174
Example - Hello World from GPU
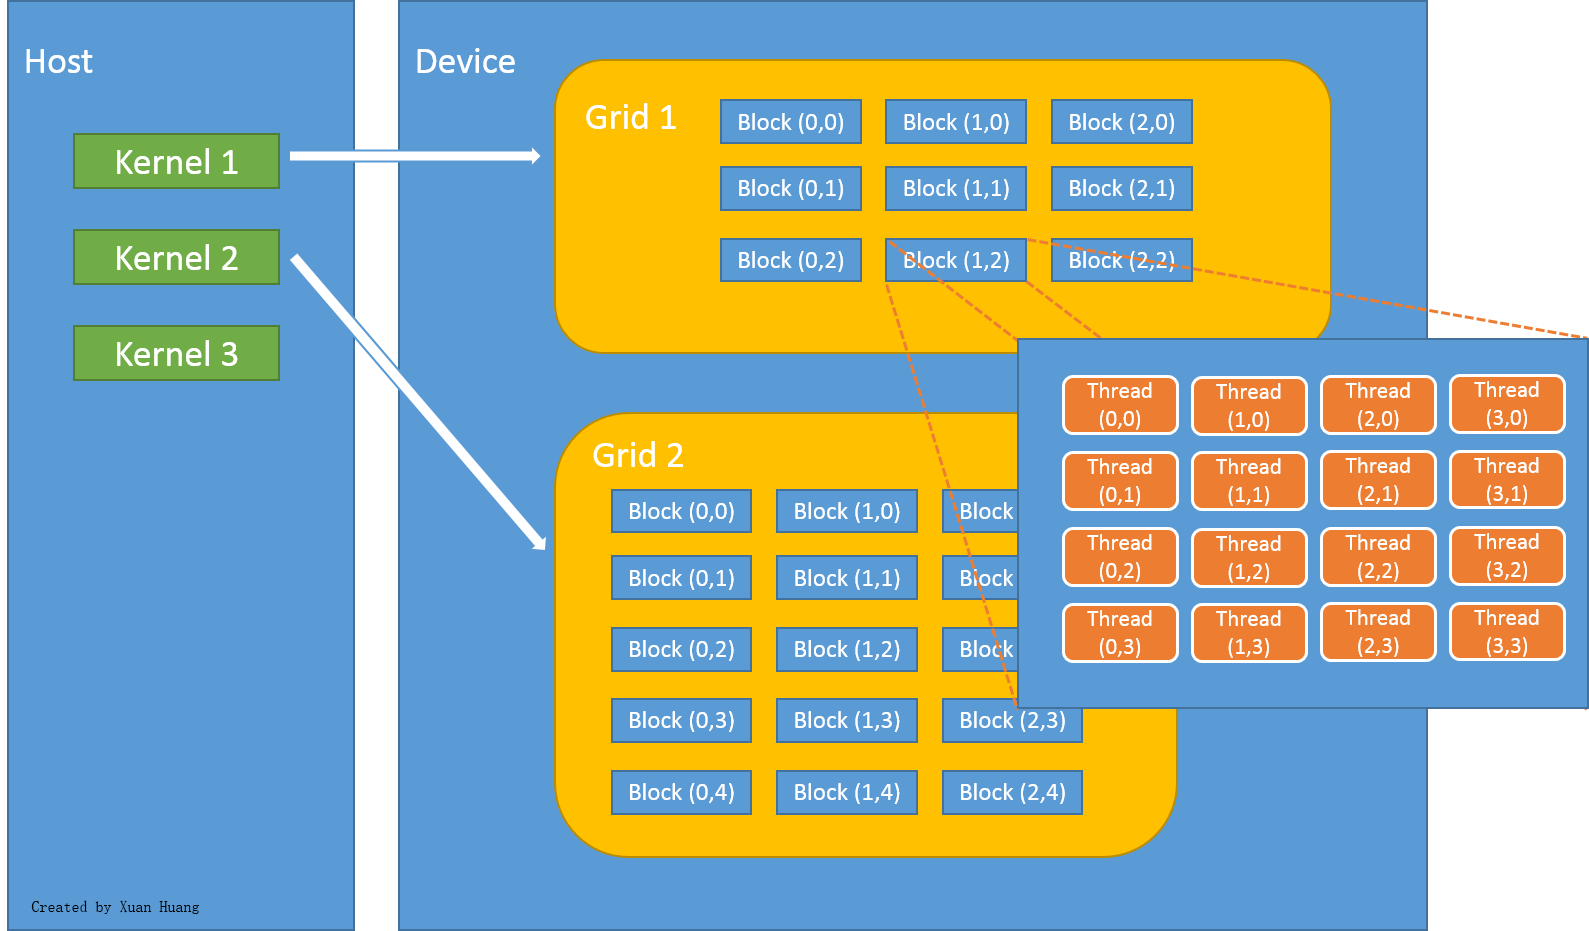
In CUDA programming language, CPU and the system's memory are referred to as host, and the GPU and its memory are referred to as device. Figure below explains how threads are grouped into blocks, and blocks grouped into grids.
|
Let's start with a Hello World program using GPU.
#include <stdio.h>

#define NUM_BLOCKS 2
#define BLOCK_WIDTH 16

__global__ void hello()
{
  printf("Hello world! I'm thread %d in block %d\n", threadIdx.x, blockIdx.x);
}

int main(int argc, char **argv)
{

  // launch the kernel
  hello<<<NUM_BLOCKS, BLOCK_WIDTH>>>();

  // force the printf()s to flush
  cudaDeviceSynchronize();

  printf("That's all!\n");

  return 0;

}
Download: ../code/hello_gpu/hello.cu
[hu6@maya-usr1 test04_hello]$ nvcc -arch=sm_35 hello.cu -o hello
#!/bin/bash
#SBATCH --job-name=gpu_hl
#SBATCH --output=slurm.out
#SBATCH --error=slurm.err
#SBATCH --partition=batch
#SBATCH --qos=short
#SBATCH --exclusive
#SBATCH --gres=gpu
#SBATCH --nodes=1
#SBATCH --tasks-per-node=1
#SBATCH --constraint=hpcf2013

./hello
Download: ../code/hello_gpu/run.slurm
[hu6@maya-usr1 test04_hello]$ cat slurm.out
Hello world! I'm thread 0 in block 0
Hello world! I'm thread 1 in block 0
Hello world! I'm thread 2 in block 0
Hello world! I'm thread 3 in block 0
Hello world! I'm thread 4 in block 0
Hello world! I'm thread 5 in block 0
Hello world! I'm thread 6 in block 0
Hello world! I'm thread 7 in block 0
Hello world! I'm thread 8 in block 0
Hello world! I'm thread 9 in block 0
Hello world! I'm thread 10 in block 0
Hello world! I'm thread 11 in block 0
Hello world! I'm thread 12 in block 0
Hello world! I'm thread 13 in block 0
Hello world! I'm thread 14 in block 0
Hello world! I'm thread 15 in block 0
Hello world! I'm thread 0 in block 1
Hello world! I'm thread 1 in block 1
Hello world! I'm thread 2 in block 1
Hello world! I'm thread 3 in block 1
Hello world! I'm thread 4 in block 1
Hello world! I'm thread 5 in block 1
Hello world! I'm thread 6 in block 1
Hello world! I'm thread 7 in block 1
Hello world! I'm thread 8 in block 1
Hello world! I'm thread 9 in block 1
Hello world! I'm thread 10 in block 1
Hello world! I'm thread 11 in block 1
Hello world! I'm thread 12 in block 1
Hello world! I'm thread 13 in block 1
Hello world! I'm thread 14 in block 1
Hello world! I'm thread 15 in block 1
That's all!
Example - Compile Host only and Device only program
Now we'll try to run a slightly more complicated program, which has several files.The main.cu program below will launch kernels and call function.
#include <stdio.h>
#include <stdlib.h>

#include "kernel.h"
#include "hostOnly.h"

int main( void ) {
    int c;
    int *dev_c;
    cudaMalloc( (void**)&dev_c, sizeof(int) );
    add<<<1,1>>>( 20, 14, dev_c );
    cudaMemcpy( &c, dev_c, sizeof(int), cudaMemcpyDeviceToHost );
    printf( "20 + 14 = %d\n", c );
    cudaFree( dev_c );
    hostOnly();
    return 0;
}
Download: ../code/make_gpu/main.cu
#include "kernel.h"

__global__ void add( int a, int b, int *c ) {
        *c = a + b;
}
Download: ../code/make_gpu/kernel.cu
#ifndef _KERNEL_H_
#define _KERNEL_H_

__global__ void add( int a, int b, int *c );

#endif
Download: ../code/make_gpu/kernel.h
#include <stdio.h>
#include <stdlib.h>

#include "hostOnly.h"

void hostOnly()
{
    printf("Host only function goes here.\n");
}
Download: ../code/make_gpu/hostOnly.cu
#ifndef _HOSTONLY_H_
#define _HOSTONLY_H_

void hostOnly();

#endif
Download: ../code/make_gpu/hostOnly.h
TEST: kernel.o main.o hostOnly.o
    nvcc main.o kernel.o hostOnly.o -o TEST

hostOnly.o: hostOnly.cu
    nvcc hostOnly.cu -c -o hostOnly.o

main.o: main.cu
    nvcc main.cu -c -o main.o

kernel.o: kernel.cu
    nvcc kernel.cu -c -o kernel.o

clean:
    rm TEST *.o
Download: ../code/make_gpu/Makefile
#!/bin/bash
#SBATCH --job-name=gpu_HK
#SBATCH --output=slurm.out
#SBATCH --error=slurm.err
#SBATCH --partition=batch
#SBATCH --qos=short
#SBATCH --exclusive
#SBATCH --gres=gpu
#SBATCH --nodes=1
#SBATCH --tasks-per-node=1
#SBATCH --constraint=hpcf2013

./TEST
Download: ../code/make_gpu/run.slurm